Any service or repair work in a vehicle requires huge knowledge on the inner structure that makes up your engine. Amongst these critical parts of an internal structure, there happens to be one connection rod that plays a huge role in the overall running of the engine.
In this article we will discuss about replacing connecting rod and piston on Hyundai Elantra and Tucson 1.8 and 2.0 NU. With the proper tools and techniques, and a little patience following a step-by-step approach, this procedure can be easily done to save your vehicle from malfunctioning and ensure its longevity.
This article will guide you through each step in great detail and also offer valuable tips to make the repair process easier on you. Introduction The connecting rod plays a very important role in a vehicle’s engine and other engine parts.
The connecting rod is a very vital component of the engine’s internal mechanism, because the role of conrod is to joins the piston to the crankshaft. It converts linear motion of the piston into a rotary motion of the crankshaft and ultimately powers your car.
A misfiring or broken connecting rod may cause several complications to the engine, such as poor performance, knocking sounds, and serious damage if not dealt with promptly.
If you think replacing a connecting rod is a big deal, with a clear plan and the right resources, this job is quite doable.
The following guide walks you through all the steps involved in the process so that you are going to attempt this repair properly informed and, more importantly, equipped to carry it out efficiently and effectively. Preparation is about getting all your tools and materials together for the task at hand.
For Buy Hyundai connection rod in Dubai, please contact us!
Step by step for to Replace the Connecting Rod on Hyundai
Before the beginning of the tutorial, keep in mind that this guides are suitable for replacing the Connecting Rod on a Hyundai Elantra Tucson. So if you have another vehicle form Hyundai brand, it is better to read other articles about it.

First and foremost, before getting down to replacement, make sure to gather all the required tools and materials. This will make your job much easier and time-saving. Here’s a list of the things you will need:
- Piston ring compressor tool: It compresses the piston rings; hence, making installation easy.
- MessageBox: To remove and install bolts
- Torque wrench: This is to tighten bolts as recommended by the manufacturer.
- Screwdrivers: May be helpful when removing several components of the engine.
- Pliers: These are handy for the holding of small parts and manipulate them.
- Oil and lubrication: This would be to minimize friction to avoid damage during the installation process.
- Replacement piston and connecting rod: These are the new parts that you will install.
- Gasket sealant: This is to ensure that everything seals up nice to prevent leakage.
Helpful Hints:
- Always work in good light to avoid any mishap.
- Wear protective gear like gloves and goggles to save yourself from the flying sharp shreds of metal and hot engine components.
In the following there is step by step tutorial of replacing Connecting Rod on a Hyundai Tucson, besides you can watch the video bellow:
Step 1: Remove Engine Components
Before getting access to the connecting rod and the piston, you have to remove a few engine components. Follow the steps below:
- Degree the Battery: The very first step you should do is to cut off the battery to prevent the chances of any unintentional electrical short while working on the engine.
- Drain Engine Oil and Coolant: Drain the oil in the engine and coolant so that it does not spill out when you are working with the cylinder head and the area is neat.
- Remove the Intake and the Exhaust Manifold: These manifolds must be removed to expose the cylinder head. Unbolt them and remove them cautiously with all screws and other parts well organized.
- Remove the Cylinder Head:
- Remove Cylinder Head: Remove the head bolts in a sequence. The sequence is important so that it will not warp the cylinder head.
- Raise Cylinder Head: After the bolts are removed, the cylinder head shall be carefully raised from its place.
Make sure that you are not doing this kinds of common Mistake:
- Label all bolts and components as they are removed to make reassembly easier.
- Watch for residual coolant spill-out when removing the cylinder head.
Step 2: Remove the Piston and Connecting Rod
Since you have removed the cylinder head, now you have access to the piston and the connecting rod. The following steps would work in removing them:
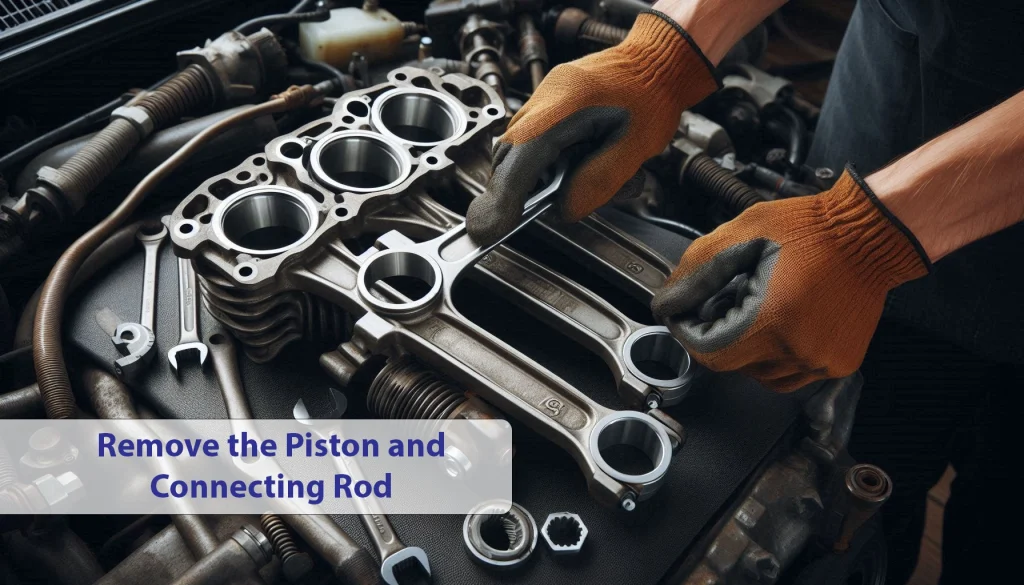
- Turn the crankshaft: Have the crankshaft turned so the piston is located at the very bottom of the cylinder.
- Applying the Piston Ring Compressor Tool: This tool compresses the piston rings so that this will loosen the piston from the cylinder.
- Remove the Piston: Slowly pull the piston from the cylinder, being really patient not to scratch the cylinder walls.
Step 3: Installing the New Piston and Rod
With the old piston and connecting rod out of the way, you’re ready to install the new parts:
1. Lubricate the New Parts: Apply some engine oil to the new piston and connecting rod. It will lubricate and allow easy fitment and also running in.
2. Installing the Connecting Rod on the piston- Head: Place the connecting rod on the piston-head carefully.
3. Compress the Piston Rings: Similar to the piston ring compressor, compress the piston rings.
4. Assembling the New Piston: Gradually compress the piston into the cylinder. It should correctly be in line with the connecting rod, for instance, the bearing part, and the crankshaft.
The connecting rod should be adequately in line with the crankshaft for accurate alignment and avoid problems.
Step 4: ASSEMBLING BACK THE ENGINE PARTS
After fixing the new piston and connecting back the rod, the following are the steps to be followed when assembling the engine parts::
1. Fix the Cylinder Head:
- Apply sealer gasket about an inch.
- Torque the head bolts to the manufacturer’s specifications securely.
2. Reattach Intake and Exhaust Manifold: Screw back the manifolds into their initial places, torquing them down with the detached bolts.
3. Fill Engine Oil and Coolant: Fill the engine with a new oil and coolant.
General Check
- Check tightly every single connection and bolt.
- The last look at the engine is ensured to all tool and parts are taken back from the engine.
Make sure that all parts are successfully replaced
Overhauling a connecting rod and piston in an engine provided with 1.8 or 2.0 Hyundai Elantra and Tucson NU engines requires good preparation and details. In following the directions of this instruction, the replacement process overhauls nicely and is successfully done. After reassembly, start the engine and listen to any unusual noises or signs of leakage. If there’s no problem at all, then congratulations! You have finally completed the repair that you have to do on your ride to continue serving its purpose.
If maintained properly and reparations are done, the engine may last long. For a professional mechanic or an enthusiast who knows personally how to do repairs, this kind of knowledge and task in planning the installation of the connecting rod is just a very great advantage for him not to waste much of his time and further expenses. Enjoy your repairing!